Monday, July 22, 2013

Tuning the levmar implementation

There are probably many ways to tune the levmar program to the system you are running it on. I highlight three below that I have come across.

On line 54 of the file "misc.h" we have:
#define __BLOCKSZ__ 32 


The properties of the system I am using are shown below via the CPU-Z program.


Given my larger L1 cache I bumped up this value from 32 to 64 (64 * 64 * 8 = 32,768 bytes).

On line 683 of the file "lmbc_core.c" there are seven choices for different linear solvers. I selected the SVD option for its robustness.
issolved=AX_EQ_B_SVD(jacTjac, jacTe, Dp, m); ++nlss; linsolver=AX_EQ_B_SVD;

Friday, July 19, 2013

Building levmar in Visual Studio with Intel's Math Kernel Library (MKL)

Often, when calibrating financial models to market data, we need access to an optimization routine that minimizes the error between theoretical results and actual market results. This allows our model to "fit" the market data as best as possible. And often times the minimization function we are interested in is non-linear. In relatively small problems one can use Matlab's "lsqnonlin" or Python's "scipy.optimize.leastsq" built-in functions. They work quite well but they are slow. I came across this C++ implementation on the internet: levmar. This is a very powerful routine built from the Levenberg-Marquardt optimization algorithm. I was very keen to try this program but faced difficulties compiling it in Microsoft's Visual Studio. The package is very easily compiled in Unix systems where LAPACK is already included. I primarily work in the Windows environment however so I needed a way of building this solution in Visual Studio. In Visual Studio 2008, 2010, and 2012 I have successfully built the executable as follows:

First create a new Visual Studio project (File -> New -> Project).
Select the Win32 Console Application and give your project a name.


I removed the files (stdafx.h, stdafx.cpp, etc.) that came with the new project (I'm not sure if this is necessary or desirable). From the levmar files downloaded from the website I copied all of the C source and header files to my new project folder (excluding everything else):
C:\Users\Joel\Documents\Visual Studio 2012\Projects\Levmar_2_6_1\Levmar_2_6_1\


Once the files are in the project folder, from the Visual Studio Solution Explorer I right click on "Source Files" and select Add -> Existing Item. But we only add the C files that don't end in "_core". 
From the README file:
Notice that *_core.c files are not to be compiled directly; For example,
Axb_core.c is included by Axb.c, to provide single and double precision
routine versions.
 Similarly, we add the header files to the "Header Files" folder in the Solution Explorer.


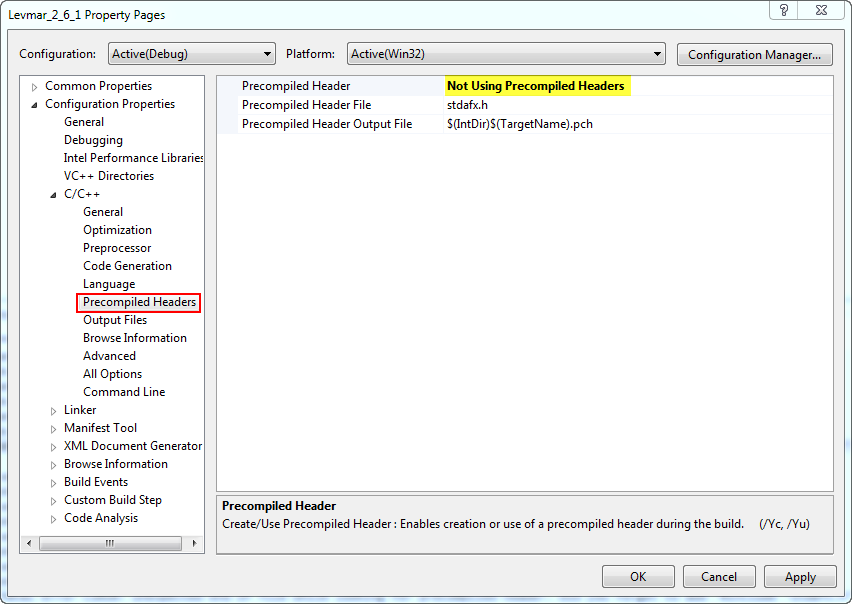
Now, if you try to build this project, you will probably be greeted with the following error message:
fatal error C1010: unexpected end of file while looking for precompiled header. Did you forget to add '#include "stdafx.h"' to your source?
To get around this I selected the following:


If we try to build our project with this change we will see the following errors:
Build started: Project: Levmar_2_6_1, Configuration: Debug Win32 ------
1>Build started 19/07/2013 2:06:05 PM.
1>InitializeBuildStatus:
1>  Touching "Debug\Levmar_2_6_1.unsuccessfulbuild".
1>ClCompile:
1>  All outputs are up-to-date.
1>  misc.c
1>  lmlec.c
1>  lmdemo.c
1>  lmbleic.c
1>  lmblec.c
1>  lmbc.c
1>  lm.c
1>  Axb.c
1>  Generating Code...
1>Axb.obj : error LNK2019: unresolved external symbol _dgeqrf_ referenced in function _dAx_eq_b_QR
1>Axb.obj : error LNK2019: unresolved external symbol _dorgqr_ referenced in function _dAx_eq_b_QR
1>lmlec.obj : error LNK2001: unresolved external symbol _dorgqr_
1>Axb.obj : error LNK2019: unresolved external symbol _dtrtrs_ referenced in function _dAx_eq_b_QR
1>Axb.obj : error LNK2019: unresolved external symbol _dpotrf_ referenced in function _dAx_eq_b_Chol
 
1>misc.obj : error LNK2019: unresolved external symbol _dgemm_ referenced in function _dlevmar_trans_mat_mat_mult
1>misc.obj : error LNK2019: unresolved external symbol _dpotf2_ referenced in function _dlevmar_chol
1>c:\users\joel\documents\visual studio 2012\Projects\Levmar_2_6_1\Debug\Levmar_2_6_1.exe : fatal error LNK1120: 30 unresolved externals
1>
1>Build FAILED.
1>
1>Time Elapsed 00:00:01.24
========== Build: 0 succeeded, 1 failed, 0 up-to-date, 0 skipped ==========
And the reason for this is that the build process cannot link to the LAPACK libraries (not included inWindows). Apparently there are ways to add this to Windows but I was unsuccessful in my endeavors. What I did instead was download a trial version of Intel's "Composer XE 2013" program. Even though this program will expire after the trial period ends we're not actually interested in the program. Rather, we are interested in the library files that get installed (as far as I know, these do not expire). If you install this program in the default directory you will see this folder:
C:\Program Files (x86)\Intel\Composer XE 2013\mkl\lib\ia32
which contains the math kernel we are interested in. To link our Visual Studio project to these libraries, do the following:


and add the following dependency:


Now we will be able to successfully build our project. The resultant executable file will be found in your project's folder (either Debug or Release depending on what you have selected). From the command prompt, I can run the executable and see the following results:


Which are just the results of the selected optimization problem found in the lmdemo.c file. It worked!

Eventually I would like to modify this project to create a library that I can call from other programs. I may also try to create a DLL out of this that I can call from Python.

Wednesday, July 10, 2013

Encryption in Python (PyCrypto)

I have been experimenting with the PyCrypto module for Python as a way of encrypting data. I am using version 2.6 on Python 2.7. I installed the Windows binary file found here. For testing purposes I created a text file "file2encrypt.txt" which contains the text: "For your eyes only! My secret message." This is what I hope to encrypt and decrypt. To create my RSA key I do the following:
from Crypto.PublicKey import RSA
from Crypto import Random

KEYSIZE = 256 * 8

def readfile(filename):
    fh = open(filename, 'rb')
    string = fh.read()
    fh.close()
    return string
    
def writefile(filename, string):
    fh = open(filename, 'wb')
    fh.write(string)
    fh.close()

random_generator = Random.new().read
RSAkey = RSA.generate(KEYSIZE, 
                      randfunc=random_generator, 
                      progress_func=None, 
                      e=65537)
public_key = RSAkey.publickey()

# Export the public key
pke = public_key.exportKey(format='PEM', passphrase=readfile('public_passphrase.txt'), pkcs=1)
writefile('../Public/public_key.txt', pke)

# Export the private key
pke = RSAkey.exportKey(format='PEM', passphrase=readfile('private_passphrase.txt'), pkcs=1)
writefile('private_key.txt', pke)
This generates a 2048-bit RSA key from which I can extract the public key. I export the key to two text files: 'public_key.txt' and 'private_key.txt'. As their names suggest the public key may be shared but the private key is meant for the sender and receiver only. The public key may be used only to encrypt data whereas the private key may be used to encrypt and decrypt data. There is an extra password/passphrase on the key export process which is needed by both parties to import the key(s). With my key in place I can now encrypt my file2encrypt.txt file.
from Crypto.Signature import PKCS1_v1_5
from Crypto.Hash import SHA256
from Crypto.PublicKey import RSA
import cPickle

def readfile(filename):
    fh = open(filename, 'rb')
    string = fh.read()
    fh.close()
    return string
    
def writefile(filename, string):
    fh = open(filename, 'wb')
    fh.write(string)
    fh.close()
    
def write_serial(filename, data):
    fh = open(filename, 'wb')
    cPickle.dump(data, fh, protocol=cPickle.HIGHEST_PROTOCOL)
    fh.close()

PASSPHRASE_PRIVATE = readfile('private_passphrase.txt')
plainfile = readfile('file2encrypt.txt')

RSAkey = readfile('private_key.txt')
RSAkey = RSA.importKey(RSAkey, passphrase=PASSPHRASE_PRIVATE)

h = SHA256.new(plainfile)
signer = PKCS1_v1_5.new(RSAkey)
signature = signer.sign(h)

# Save signature
write_serial('signature.pkl', signature)

# Encrypt file
write_serial('../Public/encryptedfile.pkl', RSAkey.encrypt(plainfile, ''))
This script loads my file2encrypt and the RSA key using the "importKey" function. The author of the encrypted file has the option to "sign" the file so that the recipient has a means of verifying that the encrypted file did indeed come from the sender (ie. the message wasn't changed during transmission). I create a serial signature.pkl file using the cPickle module. The data is encrypted via the RSAkey.encrypt() function and sent to the recipient.
On the recipient end we need to decrypt the file and verify the signature. To accomplish this I exectute the following code. This code imports the private key and verifies the signature of the message generated by the author.
from Crypto.Signature import PKCS1_v1_5
from Crypto.Hash import SHA256
from Crypto.PublicKey import RSA
import cPickle

def readfile(filename):
    fh = open(filename, 'rb')
    string = fh.read()
    fh.close()
    return string
    
def read_serial(filename):
    fh = open(filename, 'rb')
    data = cPickle.load(fh)
    fh.close()
    return data
     

encodedfile = read_serial('../Public/encryptedfile.pkl')

RSAkey = readfile('private_key.txt')
RSAkey = RSA.importKey(RSAkey, passphrase=readfile('private_passphrase.txt'))

# Decrypt data
plaindata = RSAkey.decrypt(encodedfile)

# Verify author
h = SHA256.new(plaindata)
verifier = PKCS1_v1_5.new(RSAkey)
signature = read_serial('signature.pkl')
if verifier.verify(h, signature):
    print "The signature is authentic.\n"
    print plaindata
else:
    print "The signature is not authentic."

If you print the string "plaindata" you will see "For your eyes only! My secret message". We have succeeded in decrypting the original message and verifying it's authenticity.


Monday, June 10, 2013

Downloading Historical Data from Google Finance

My background is in quantitative finance and it is nice to be able to apply what I have learned in school to my own (albeit small) portfolio. This requires some historical market data. My first attempt at this was to visit the Google Finance website and manually download the information into a CSV file. This was rather tedius. I came across Python's urllib2 module which has given me a means to automate this process. I also employ the use of the PyTables module to store my data in the HDF5 format. I am working in a Windows environment on the pythonxy IDE with PyTables version '2.4.0'. The code is as follows:
import numpy as np
import tables as pt
import urllib2
import re
import string
from datetime import datetime

urlT = string.Template('http://www.google.ca/finance/historical'+
               '?cid=$cid&startdate=$start&enddate=$end&output=csv')

##----------User specified----------##               
startdate = datetime(2010,1,1)       #
enddate   = datetime.today()         #
equity_list = [('NYSE'  ,'CMI'),     #
               ('NYSE'  ,'FCX'),     #
               ('NYSE'  ,'MCD'),     #
               ('NYSE'  ,'TWI'),     #
               ('NYSE'  ,'SLB'),     #
               ('NASDAQ','AAPL'),    #
               ('NASDAQ','MIDD'),    #
               ('NYSE'  ,'GG'  ),    #
               ('NYSE'  ,'AUY'),     #
               ('PINK'  ,'LYSDY')]   #
##----------User specified----------##  
               
def getGoogleID(equity):
    url = 'http://www.google.ca/finance?q={0[0]}%3A{0[1]}'.format(equity)
    response = urllib2.urlopen(url, 'r')
    for line in response:
        match = re.match('setCompanyId\([0-9]+\);\\n', line)
        if (match != None):
            gid = line[13:-3]
            return gid
    else:
        raise Exception('Google ID not found for \'%s\''%equity[1])
        
def d2strfmt( date ):
    return date.strftime('%b')+'+'+date.strftime('%d').lstrip('0')+'%2C+'+date.strftime('%Y')
               
date_t = np.dtype([('year', '<i4'),('month', '<i4'),('day', '<i4')])
str_t = np.dtype((np.str_, 8))
equity_format = np.dtype([
    ('date'    ,date_t),
    ('open'    ,np.float64),
    ('high'    ,np.float64),
    ('low'     ,np.float64),
    ('close'   ,np.float64),
    ('volume'  ,np.int64)
], align=True)

filters = pt.Filters(complevel=6, complib='bzip2', shuffle=True)
h5file = pt.openFile('market_data.h5', mode='w')
group = h5file.createGroup('/', 'equity', filters=None)
for exch, tckr in equity_list:
    gid = getGoogleID((exch,tckr))
    table = h5file.createTable(group, tckr, equity_format, title=str(gid), filters=filters, byteorder='little')
    equityinfo = table.row
    url = urlT.substitute(cid=gid,start=d2strfmt(startdate),end=d2strfmt(enddate))
    u = urllib2.urlopen(url, 'r')
    u.readline() # Skip header
    for line in u:
        parsedline = line.rstrip().split(',')
        for j in xrange(len(table.colnames)):
            field = table.colnames[j]
            if (field=='date'):
                dt = datetime.strptime(parsedline[j],'%d-%b-%y')
                equityinfo[field] = (dt.year, dt.month, dt.day)
            else:
                if (parsedline[j] == '-'): # Holiday: no information
                    equityinfo[field] = np.nan
                else:
                    equityinfo[field] = parsedline[j]
        equityinfo.append()
    table.flush()
h5file.close()
This creates a file called 'market_data.h5' which you can view with the ViTables program. The file contains an 'equity' group with one table for each stock. I'll create another post showing how we can use this data. In the meantime, I just wanted to show how we could download and store the data. My next steps are to include FX rates and interest rates.

Friday, June 7, 2013

Adding fonts to Python's ReportLab Module

I have been experimenting with the ReportLab module for Python and have been suitably impressed thus far. One thing that I found restrictive however was the default number of fonts available. To that end I worked on trying to figure out how to add more font options. I should qualify at the outset that I am working in a Windows environment with the pythonxy IDE using ReportLab version 2.6. You can find instructions for how to do this in both the user guide (download here) and in their FAQ. I really like the "Computer Modern" typeface found in TeX so this example tries to register these fonts to ReportLab.

The first thing I needed to do was to get my hands on the font files. You can find lots of open source fonts here: http://mirror.csclub.uwaterloo.ca/CTAN/fonts/. I got what I believe to be the Computer Modern fonts from here: http://mirror.csclub.uwaterloo.ca/CTAN/fonts/amsfonts.zip. This zip file contains two folders of interest:
  1. afm (Adobe Font Metrics)
  2. pfb (Printer Font Binary)
From what I gather in the documentation, both are required to load into ReportLab. My next step was to simply load all the fonts found in these folders. Each font needs both a afm and pfb file. I setup my script to open both folders, find the filename common in both (ex. cmb10.afm and cmb10.pfb), and register those fonts (see code below).
import os
from reportlab.pdfbase import pdfmetrics

afmdir = 'path to afm files'
pfbdir = 'path to pfb files'
afmfiles = os.listdir(afmdir)
pfbfiles = os.listdir(pfbdir)
for j in xrange(len(afmfiles)):
    afmfiles[j] = os.path.splitext(afmfiles[j])[0]
for j in xrange(len(pfbfiles)):
    pfbfiles[j] = os.path.splitext(pfbfiles[j])[0]
afmfiles = set(afmfiles)
pfbfiles = set(pfbfiles)
commonfiles = afmfiles.intersection(pfbfiles)
fontnames = []
for afmfile in commonfiles:
    filename = afmdir + afmfile + '.afm'
    f = open(filename, 'r')
    try:
        f.readline()
        f.readline()
        line = f.readline().rstrip()
        fontnames.append(line[9:])
    finally:
        f.close()
for j, ffile in enumerate(commonfiles):
    afmfile = afmdir+ffile+'.afm'
    pfbfile = pfbdir+ffile+'.pfb'
    pdfmetrics.registerTypeFace(pdfmetrics.EmbeddedType1Face(afmfile, pfbfile))
    pdfmetrics.registerFont(pdfmetrics.Font(fontnames[j], fontnames[j], 'WinAnsiEncoding'))
    
print pdfmetrics.getRegisteredFontNames()
A couple of points to note:
  1. To register the font you need to give it the fontname. This is found directly in the afm file (3rd line).
  2. I am using the 'WinAnsiEncoding' which means not all the fonts loaded will be usable.
To make use of all these new fonts and see how they looked I ran the following script to create a table in a PDF document with all the fonts displayed (because of the WinAnsiEncoding not all fonts will work and will just show a blank).
from reportlab.lib.pagesizes import letter
from reportlab.lib.styles import ParagraphStyle, getSampleStyleSheet
from reportlab.platypus import BaseDocTemplate, Frame, PageTemplate, Image, Table, TableStyle, Spacer, PageBreak
from reportlab.platypus.doctemplate import _doNothing
from reportlab.lib.units import inch
import reportlab.lib.colors as colors
import defs
import locale
locale.setlocale(locale.LC_ALL, 'English_Canada.1252')
registeredFonts = defs.registerAMSfonts()

PDF_VIEWER = 'C:\\Program Files (x86)\\Adobe\\Reader 10.0\\Reader\\AcroRd32.exe'
PDF_FILENAME = 'C:\\Users\\Joel\\Documents\\Python\\ReportLab\\rev3\\TestFonts.pdf'

elements = []

doc = BaseDocTemplate('TestFonts.pdf', pagesize=letter)
f0 = Frame(doc.leftMargin, doc.bottomMargin, doc.width, doc.height, id=None, showBoundary=0)
template = PageTemplate(id='test', frames=[f0], onPageEnd=_doNothing)
doc.addPageTemplates([template])

val1 = locale.format('%9.2f', -15197114.48, grouping=True)
val2 = locale.format('%9.2f', -16790937.16, grouping=True)

data = [['Index', 'Value 1', 'Value 2', 'FontName']]
for j in range(len(registeredFonts)):
    data.append(['%d'%j, val1, val2, registeredFonts[j]])
tablestyle = TableStyle([
    ('ALIGNMENT',(0,0),(-1,-1), 'RIGHT'),
    ('FONTSIZE', (0,0),(-1,-1), 10),
    ('VALIGN',   (0,0),(-1,-1), 'BOTTOM'),
    ('INNERGRID',(0,0),(-1,-1), 0.25, colors.black),
    ('BOX',      (0,0),(-1,-1), 0.5, colors.black)])
for j in xrange(len(registeredFonts)):
    tablestyle.add('FONTNAME',(0,j),(3,j),registeredFonts[j])
table1 = Table(data,
               colWidths=doc.width/4.0,
               rowHeights=18,
               style=tablestyle)
elements.append(table1)
elements.append(PageBreak())
doc.build(elements)

import subprocess
process = subprocess.Popen([PDF_VIEWER, '/A', 'view=FitH', PDF_FILENAME], shell=False, stdout=subprocess.PIPE)
process.wait()
I am using the "subprocess" command to have Python automatically launch Adobe's Acrobat Reader to view my newly created document. The results look something like this: